Accidentally Cooking

Documenting my mistakes in the garden, kitchen and pantry


2 Comments

Half-Sour and Full-Sour Pickles

For Xmas two years ago I got a book The Joy of Pickling. Overall, I really like the book. It has a huge assortment of recipes, including things that I didn’t even know were possible. Reading through it, I’ve become inspired to try a whole variety of new recipes that I wouldn’t have even known about before hand.

But…there are a few little things about the book that irritate me. Recipes come in all shapes and sizes. Some recipes only fill a pint jar, while others are multiple quarts. It’s not always obvious how to scale recipes from one size to the other, especially if it’s based on how much you can “pack” into each container, and how much liquid it takes to cover. Many recipes call for ingredients that I have trouble finding, and don’t give any indication about variations or substitutions.Very similar recipes, adjacent to each other in the book come in different sizes that aren’t easy to compare directly. Measurements of ingredients sometimes come by volume, sometimes come by weight.

To give an example, there are two recipes for pickled cherries, right next to each other, on opposing pages. The first recipe makes a pint, and lists the amount of cherries by volume. The very next recipe, described as a “variation” on the first, makes a quart and measures cherries by weight.

In the same vein, salt is always (that I have seen) listed by volume, with the caveat that you use special “pickling salt”. Kosher salt or sea salt  tend to have lower density and so you can’t use the same volume measurements for those. You can “make your own” pickling salt by tossing kosher salt into a food processor or spice mill to grind it much finer. However, considering that you are just going to dissolve the resulting salt in water and lose all texture, that seems like a huge waste of time. A real solution, of course, is to just give your salt measurements by weight (or, gasp!, give both measurements).

I’ll stop complaining now, because it really is a fine book despite some of the small issues.

Dana and I would both like to reproduce the deli pickles we can get from our super market. I searched through the book to find two recipes which I thought were the closest. I put up a batch of each. We’ll taste the results, compare them to our target, and maybe try again with a better frame of reference.

DSC_3897


This image shows the two jars of pickles. Full sours on the left and half-sours on the right.

Full Sour Dill Pickles

My intuition is that the “Half Sour” pickles are closest to what we are after, but in the book she describes the “Lower East Side Full Sour Dill” as the kind that New Yorkers would expect to find in their delis. Deli pickles are, after all, what I am after, so I included this recipe in my test. Her recipe for this makes 3 quarts, so I’ve adapted the recipe to be per-quart-jar. I’ve also adapted the recipe to use generic pickling spice, because I don’t have all the individual spices on hand (she calls for allspice and coriander seeds).

  • Pickling cucumbers, blossom ends removed
  • 1 garlic clove, chopped
  • 2 Dill heads
  • Dash crushed red pepper flakes
  • 1 Tsp pickling spice
  • 1 Tsp whole black pepper corns.
  • 1 quart water
  • 1/4 cup kosher salt.

Mix the salt and water together until the salt dissolves.

Pack the remaining ingredients into the jar. Add brine to cover. Put the remaining brine into a plastic bag to put on top. The bag helps hold the cucumbers under the surface.

Bubbles should appear after 3 days. Let the pickles sit and ferment for 3 weeks, skimming scum and other garbage off the top daily.

Half Sour Dill Pickles

Her recipe for Half-Sour pickles, in true form, is a 1-quart recipe instead of the 3-quart recipe for the Full Sours. It’s hard to really compare the two like that, but I’ll deal with it. The recipe for this is almost exactly the same as above except for the strength of the Brine (she includes bay leaves here, but that’s already part of my Pickling Spice mix, so they are identical for me):

  • 3 cups water
  • 2 Tablespoons Kosher Salt

Make these in the same exact way. Let them sit for 2 weeks instead of 3, skimming daily.

Results

The pickles are good, but not great. The first thing to mention is that the “Pickling Spice” I used in these recipes contain several ingredients I wasn’t aware of, and which don’t help the flavor: Cinnamon chief among them. The pickles do have a bitter, cinnamony aftertaste that really hurt the final flavor. Next time, I’ll definitely buy the individual ingredients and mix them together myself. I’ve been looking for things like whole cardamom and coriander seeds from my local supermarket to no avail. I may have to find a different source for these.

Besides the off-flavors of the pickling spice, the half-sours are probably closest to the deli pickle we are trying to get. My next batch will be based on that recipe, with modifications.

The Full Sours were way too salty for our liking. We’ll eat these pickles, but we won’t make that recipe again.


Leave a comment

Cherry Butter

I have a rule: When cherries get down to 1.99$ per pound or less I pounce on them like a lion who….pounces….on things. Whatever. I’ll work on the metaphor later. Don’t judge me.

Last year I couldn’t even find sweet cherries in the grocery store for any price, but this year they came down to 1.99$ for a brief, glorious moment. I ended up with three bags. Three bags, and no immediate plans for what to do with them. I sat down for some serious brainstorming (and, truth be told, browsing funny cat pictures on the internet. I have an attention deficit thing).

I decided to try out a recipe for pickled cherries I got from my pickling book, but that was only a pint. I needed something to do with the rest. (The pickled cherries take about a month to brine, so I’ll post that recipe with review when I have a chance to taste them).

I have been keeping a recipe for Chai Cherry Butter in the back of my head since I first saw it last year. I didn’t have the spices needed, but I liked the general idea of making a cherry butter. So, that’s what I made (next year, maybe, I’ll try the Chai version).

This recipe doesn’t include any measurements, because they really aren’t necessary. A simple cherry butter has only a single ingredient, and you just cook it down until it’s the texture you want. Things get only a little bit more complicated if you want to preserve the results in a sealed jar, but not by much.

Cherry Butter.

  • Cherries, rinsed, stemmed and pitted.
  • Sugar
  • Cinnamon
  • Vanilla Extract
  • Amaretto
  • Lemon Juice

Put the cherries in a crock pot, along with some sugar (about a cup, to taste) to help release the juices. I added the cinnamon here to really incorporate the flavor, but you can add it later too. Set the temperature to high and just cook the heck out of them for a long time. At least a few hours. Blend the cooked cherries with an immersion blender or, working in batches, with a regular blender.

DSC_3893

Continue cooking the mush down until it has your preferred fruit butter consistency. Stir in the vanilla and amaretto. Cook a bit longer to let some of the alcohol boil off.

Fill warm, sterilized jars with the butter. Add lids and bands, then process in a boiling water bath for 15 minutes.

Results

The resulting butter is fantastically good. It has some of the same character as an apple butter or a peach butter, but with a strong cherry flavor that has to be tasted to be believed. The cinnamon was added very early in the process so its flavors were subtle and mellow. I wasn’t trying to make a “Vanilla Cherry Butter”, I only wanted to add a dash of vanilla to help bring out the cherry flavor. Dana says she can taste the vanilla clearly, but I feel like I hit it right on the mark. The amaretto, like the vanilla, was not intended to change the flavor in a major way. Instead I wanted it to just add some background complexity, which it did.

DSC_3894

I never cook my fruit butters down as far as some people on the internet do. The consistency is good and thick but still spreadable. The flavor is great. Just, great. I don’t know why I’ve never made this before but I will most certainly be making it again.


Leave a comment

Challah Bread

Fresh off my success with the Apple Sauce and Oat Bread, I decided to try my hand at something a bit more traditional. At first I looked at some recipes for the bread machine but I kept coming back to loaves that would have needed some handling. To me, putting a bunch of ingredients into the bread machine, only to take the dough ball out later to kneed it or shape it, doesn’t save me any effort. If I’m putting all the ingredients into a machine, it might as well be my wife’s trusty Kitchen Aid mixer.

The bread type that I decided I wanted to make was Challah. I found a very interesting recipe online that caught my eye because it used some orange juice in place of plain water. I was sold, even though I didn’t expect the small amount of juice to produce any noticeable orange-y flavor. I can’t help it, I just like jamming fruits and juices into recipes where you don’t expect them. I’m a maniac.

I didn’t make any major changes or substitutions to the recipe, so I’m reproducing it here as a relatively faithful, albeit terse, paraphrasing of the original. I did leave out the poppy seeds, as a matter of personal preference. I’ll give a review of my results, and suggest you go read the original recipe for more information,

Challah Bread

  • Package of dry bread yeast
  • 1 Tsp sugar
  • 1/2 Cup warm water
  • 1/3 Cup orange juice
  • 1/4 Cup extra virgin olive oil (+ extra)
  • 3 Eggs
  • 1/4 Cup honey
  • 1-1/2 Tsp sea salt
  • 4-1/2 Cups all-purpose flour (+ extra)
  1. Combine the yeast, water and sugar in your mixing bowl, mixed gently. Wait 5 minutes for the yeast to proof and foam up.
  2. Whisk in the orange juice, olive oil, 2 of the eggs, the honey and the sea salt
  3. Using the bread hook of your mixer, begin beating the mixture. Add in flour, 1 cup at a time, waiting between cups to make sure that the result is smooth.
  4. When all the flour is in, mix for 5 more minutes until the dough is smooth and elastic
  5. Pull the dough out of the mixing bowl onto a floured surface. Kneed by hand for two minutes
  6. Form the dough into a ball and put it into a lightly oiled bowl, turning to coat with oil
  7. Let the dough rise until doubled in size, 1-2 hours. Punch down.
  8. Let the dough rise until doubled in size, about 1 hour more. Punch down.
  9. On a floured surface, cut the dough ball into 4 even pieces. Roll each out into strands.
  10. Braid the 4 strands into a round. Place it on a greased cookie sheet.
  11. Whisk the remaining egg, and wash the surface of the bread with egg. Allow the loaf to sit for 30 minutes more.
  12. Preheat the oven to 350F.
  13. Bake the bread for 30-40 minutes, or until done.

Results

I’m pretty happy with this bread. It looks great, smells fantastic, and tastes like Challah.

DSC_3725

DSC_3726

DSC_3724

There’s something not quite right about the texture of it, however. It’s too….floury, and not smooth enough. Maybe I added too much flour, or maybe I didn’t kneed enough or didn’t let it rise long enough, or something. The recipe calls for 4.5 cups of flour, so that’s what I added to the mixing bowl. I don’t know if that last half cup was supposed to be reserved for flouring my countertop. Maybe I worked too much extra flour into the dough when I was kneeding it. In the pictures from the original recipe, the dough appears to be stickier than it ever was for me. Next time, I’ll follow my gut and cut down the flour to 4 cups even, to see if that helps.

Dana also commented that she thought the bread could have used a little more salt. I thought it was fine in this department, but I could be convinced to add a little extra next time.

Besides the texture issue, which all but disappears in the presence of some butter, this loaf of bread was a big success. I’m really looking forward to figuring out what my next loaf is going to be.


Leave a comment

Simple Mead 2

My first Simple Mead isn’t done yet, so I’m not sure how it’s going to ultimately turn out. That’s enough of a success story for me, so I went ahead and started another batch of a simple mead. This time, I used some different yeast and some different techniques, to contrast with my first effort.

I was thinking about doing something more complicated, like a bochet (caramelized honey mead) or some kind of melomel (mead with fruit/juice), but it occurs to me that I still don’t have a good baseline understanding of mead making. Since I’m not versed in the basics, I can’t attempt an improvement or complication on the recipe with any confidence. What I need to do is stick with the basics, for now.

Simple Mead 2

  • 1 Quart Honey [1]
  • Water [2]
  • Yeast nutrient
  • Yeast [3]

Sterilize your fermenter and all equipment. Add the honey to your fermenter [4]. Add water to bring the total volume up to around 1 and a quarter gallons of must [5]. Put on the lid and shake vigorously to aerate. Add your yeast and yeast nutrient to the must. Cover the fermenter and attach the airlock.

Let sit, in a warm room for 3 weeks or until primary fermentation is complete [6]. Rack to a secondary fermentation to age until its ready to drink.

First Rack

When primary was complete, I racked to secondary stealing a sip along the way. The mead is definitely young, though noticeably smoother and less harsh than the first batch.

Because my first racking of the prior batch was so sloppy, I needed to rack again to tertiary. I tasted it again along the way, but even after two months my Simple Mead 1 is harsher, less floral and has a little less honey character than this second batch is on the way into secondary. I suspect that the “Sweet Mead” yeast just produces a result that is smoother out of primary.  I may stick with that (or, at least, steer clear of the Champagne yeast) for the next few batches.

Here is a picture of the two batches, Simple Mead 1 on the left and Simple Mead 2 on the right.

DSC_3733

Notes

  1. I used a combination of left-over “Local Honey” from my first batch and some crystallized clover honey from the back of my closet. The honey and a little bit of water used to loosen it up, came out to just over a quart by volume. I didn’t weigh the honey and don’t have a hydrometer, so I can’t tell you exactly what the sugar content or starting gravity is.
  2. I used bottled spring water.
  3. The yeast I used this time was WLP-720 “Sweet Mead” from White Labs. I didn’t realize at the time, but the vial I bought was after it’s sell-by date. I made a small starter with water, honey and a dash of nutrient, and allowed to sit out, covered, overnight. By the next morning the starter was bubbling and active, so it was ready to use. This yeast has an attenuation of 75% or more, so I am expecting the finished product to be quite sweet.
  4. I heated the honey up in a double-boiler arrangement to get it loose enough to pour. Some recipes require the honey to be boiled, but I’ve been advised not to heat the honey hotter than 165°F for risk of losing quality.
  5. I wanted a little bit extra, because I lose a bit on every racking. When it gets into secondary, I’m sure I’ll have much closer to 1 gallon.
  6. It took well over 3 weeks for this batch to finish primary, and even then I’m not convinced that it was 100% complete, but I had a limited window of time to rack it, so that’s when it happened. I suspect the Sweet Mead yeast is just a little bit less vigorous than the Champagne yeast and other yeasts I’ve used for other things.


Leave a comment

Dried Tomatoes In Oil

My camera was on the fritz (it ran out of battery, and I was too lazy to find the charger), so this post and a few others have been on hold waiting for pictures.

I really want to call them “sundried”, because that word just rolls off the tongue a little bit easier than calling them “dehydrated tomatoes”. Then again, I’ve seen plenty of products at the grocery store with the phrase “sundried tomatoes!” painted across the front, but with an ingredient list that includes tomatoes dehydrated or freeze-dried using a variety of non-solar means. I wonder if it’s technically a lie to call a tomato “sundried” if you put them in a big industrial dehydrator which is connected to a big solar panel somewhere?

Regardless.

I made a big batch of dried tomatoes in my parent’s dehydrator. Last year when I made dried tomatoes, I put them in an air-tight container but they ended up growing mold anyway. This year, I decided I wanted to try a little harder and create something that would actually keep for a while. I created a recipe in the usual way: by finding a few popular recipes on the interwebz and using my complete lack of talent, expertise and imagination to cobble them together in the worst way possible.

Dehydrator Dried Tomatoes

  • Tomatoes
  • Salt and Pepper, to taste

Cut the tomatoes into chunks suitable for drying [1]. Squeeze out the excess liquid and arrange the pieces in a dehydrator. Sprinkle with salt and fresh ground black pepper to taste. Sprinkle with other herbs or flavoring ingredients as desired. Follow the instructions that came with your dehydrator to dry the tomatoes.

Most recipes I’ve seen call for a variety of herbs and other seasonings to be used. If you want, cool. I didn’t think it was necessary and the resulting tomatoes were perfect without anything else.

Dried Tomatoes In Oil

  • Dried Tomatoes
  • Olive Oil
  • Red Wine Vinegar

I didn’t put measurements because you don’t really need them.

In a medium-sized pot, put a sufficient quantity of oil. Bring the oil up to boiling temperature [2]. Remove from heat.

Start with about a cup of red wine vinegar in a separate small pot and bring to a boil. Once the vinegar has boiled, remove from heat. Using a handful at a time, dunk the tomatoes into the vinegar, shake off the excess vinegar, and put the tomatoes into a prepared, sterilized jar. Be careful not to pack them too tightly.

Fill each jar to within 1/2 inch with the heated oil. Put on a sterilized lid and process the jars in a boiling water bath for 20 minutes (for half-pints) [3].

Results

I was a little apprehensive about these, just because nobody on the internet can give me a definitive answer about whether this recipe is safe or not. When I opened up the first jar, a few weeks after they were canned, I was pleasantly surprised. There was nothing visibly amiss, and the contents smelled exactly like they did when they went in: olive oil and tomatoes. The flavor was fantastic: sweet with a little tang and a great tomato flavor. I didn’t use any herbs, garlic or other seasoning, so it’s hard to compare my version with the store-bought varieties, but they were very tasty.

They were a little softer coming out than they were going in. Not a lot, but definitely softer. If your dehydrated tomatoes are a little bit too hard and you think they won’t work, you may be surprised.

Most other recipes I’ve seen call for a variety of dried herbs and garlic to further season the result. I didn’t think it was necessary and when I eat these bad boys I don’t think anything is missing. One day I may try some garlic and dried basil, but this is not that day.

DSC_3402

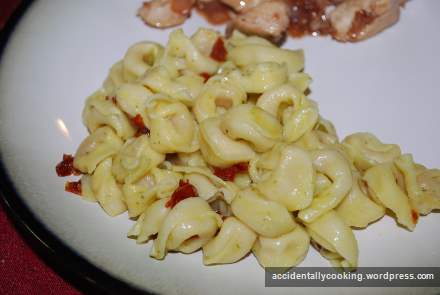
We (my wife) decided to chop a few of them up and use them over some cheese tortellini. I chopped a few of these tomatoes, and we added them to the tortellini with a cube of frozen basil, some butter, some grated Parmesan cheese and some fresh ground black pepper. The resulting pasta was very good indeed.

DSC_3394

DSC_3395

Notes

  1. With cherry tomatoes, I cut them in half. With average-sized plum tomatoes I’ve cut them into quarters. Larger tomatoes are going to need more cuts. I’ve had trouble with the skin of plum tomatoes preventing the backside from drying out evenly. Some sources recommend you skin the tomatoes before you dehydrate them. I think that’s too much effort. In the future I may try scoring or puncturing the tomato skins to help the liquid escape more easily.
  2. Oil doesn’t boil at the same temperature that water does, so you can get oil very very very hot before you see any visible changes (and it will probably be smoke, instead of bubbles). Heat the oil over medium heat until small drops of water dripped into the pan cause a “pop”, not a violent explosion. If it explodes violently, you’ve gone too far. Also, keep your face away from the pan while you do this.
  3. In theory, this recipe should be mostly safe. The oil and boiling water processing should keep most bacteria and other pathogens out, and the vinegar should be sufficient to keep botulism at bay. However, I have not yet seen any actual scientific proof that this is a safe and reliable method. Use at your own risk, and given the choice make sure to err on the side of caution. If you attempt this and it goes south for you, you never met me I don’t know you.


Leave a comment

Small Batch Chicken Broth

To give the pressure canner a quick workout, I decided to make a small batch of chicken broth. We picked up a pack of 4 bone-in split breast chicken breasts, and we had to use them up quick. I butchered them up, and got straight to cooking. The bones and some other vegetables we had laying around went into a pot to make some broth. Then I tossed the meat into a crockpot to make some shredded chicken for easy meals. I’ll include those recipes later.

Chicken Broth

I’ve already covered this recipe, in general, so I’m only going to give some of the particulars today.

  • 4 split chicken breasts, or equivalent amount of other chicken parts, meat and excess skin and fat removed [1]
  • 1 Onion, skinned and quartered
  • 4 little cloves of garlic, skinned [2]
  • 6 Sticks of Celery, rinsed  [3]
  • 2 Bay Leaves
  • Various herbs and seasonings (fresh-crushed black pepper, dash of celery seed, dash of whole dried rosemary leaves, some sea salt)
  • 1 cup of wine [4]
  • 2 Tbsp oil (I used a mix of olive and vegetable oils, because I was running out of one)

Put the garlic, onion and celery in the pot. No, wait. Put the oil in first and heat it up over medium heat, then put in the other stuff. Add seasonings. On top, put the chicken bones. Let that cook for a little while. It might have been like 5 minutes, I wasn’t paying attention. You want the vegetables to get some brown on them. Add the wine, and let simmer for a little while until the alcohol has evaporated (just guesstimate, this isn’t science class). Add enough cool water to cover. Put the lid on, and bring to a boil over high heat. Lower to a simmer and cook that sucker for a while [5].

DSC_3302

Strain the broth. Put it in the fridge overnight to cool completely. The next day, skim the congealed fat off the top and bring to a boil. Ladle into prepared pint jars. Following the directions on your fancy-shmance pressure canner, process at 11 pounds of pressure for 20 minutes [6].

Properly prepared in a pressure canner, this broth should be completely shelf-stable, without refridgeration for years. Keep it in a cool, dark place anyway.

DSC_3303

Notes

  1. Sloppily and hastily
  2. You know, those stupid little cloves that are in the middle of the head of garlic, that are almost not worth peeling because they’re so little and stupid? Yeah, those.
  3. Normally I wouldn’t use so much, but it was starting to go bad and whatever we didn’t use here was going straight into the compost pile. Also, we didn’t have any carrots in our damn fridge, for the first time in months, so I had to make up a little bit of slack in the flavor profile.
  4. Also, a cup to put in the broth after you drink the first cup. I used a white zinfandel
  5. I didn’t time it. It was probably about 2 hours. Cook until the chicken bits are falling apart and you’re bored with waiting.
  6. I got two pints. The recipe with my canner said to process 20 minutes for pints and 25 minutes for quarts. If you make a big enough batch, keep this in mind. Also, do whatever mathemagic you need if you’re at a high altitude.


Leave a comment

Chicken Salad

There are two recipes I make regularly that I think are strong enough to form the foundation of a menu if I ever wanted to start my own restaurant. Sometimes I think about doing exactly that, but then I remember that the restaurant business involves hard work, long hours, and no software. Full Stop. Instead, I think I’ll just keep making these favorites for family and friends.

The first is my French Onion Soup. It doesn’t always turn out, but when it does the results are phenomenal. The second is my Chicken Salad recipe. Actually, it’s not my recipe originally. I learned it from my mother, who learned it from her mother. I’m not sure if that’s the end of the chain, either. Regardless, the recipe is fantastic and people always love it every time I make it.

This chicken salad recipe is unique, I’ve never known another person to make it the same way (besides my family, of course). Other people have stumbled onto the same general idea: add a little sweetness to the chicken salad. I’ve seen other people instead add sliced grapes, diced apples, orange marmalade, or some other fruit products. All valiant efforts, but this version is, I think, superior to all the rest.

In addition to the Macaroni and Cheese recipe we also made another big batch of chicken salad for Easter, and everybody loved it like usual. Without further adieu, here is my chicken salad recipe:

Nana’s Chicken Salad

  1. Boneless, skinless chicken breast
  2. Celery (approx. 1 stalk for every 2-3 breasts)
  3. Celery Seed
  4. Carrots (approx. 1 carrot for every 2-3 breasts)
  5. Black Peppercorns
  6. Bay Leaves (approx. 1 bay leaf for every 4-6 breasts)
  7. Salt
  8. Mayonnaise
  9. Major Grey’s Chutney

Put the chicken in a large pot and cover with cold water. Add roughly broken stalks of celery and peeled, roughly broken carrots to pot. Add a handful of pepper corns, a generous sprinkle of celery seed, a sprinkle of salt, and bay leaves. Bring the pot to a boil on high heat, then turn it down to about 75% or less so it keeps boiling but doesn’t go all crazy. Give it a quick stir after it gets going to make sure the chicken on the bottom isn’t getting burned. Continue boiling, covered and undisturbed, for about 1 hour or more.

DSC_3227

Remove chicken from pot. Remove stuck-on peppercorns and allow to cool. Once cool, pat off any extra water and chop your chicken into bite-sized cubes. The meat should be falling apart and stringy, and the cubes will further fall apart once you start mixing so you don’t need to be too precise. Put the chicken into a large mixing bowl. Discard the broth and the vegetables.

DSC_3229

Add a generous sprinkle of salt and fresh cracked black pepper to the chicken. Add mayonnaise and chutney to the chicken in about a one-to-one ratio. Start small, mixing and testing for flavor and consistency. Remember that you can always add more of the dressing, but you can’t take it away. The mayo adds creaminess and richness. It also helps to cut some of the sweetness and tartness from the chutney. The chutney, of course, adds the characteristic “OMG What is that!?!” flavor that people love so much. Salt, as I mentioned, is going to be very important to add because the chicken will be so absorbent of flavors. If you’re at a good consistency but the flavor isn’t bright enough, try adding a bit more salt.

DSC_3238

DSC_3243

Dana likes the chicken salad with mustard. I like it plain. It goes great on almost any type of bread or croissants. Sometimes we’ll eat it with lettuce and a big fresh slice of tomato or avocato (or both!).  Most of the time it’s perfect all by itself.

Variations

  1. Add finely diced celery to the mixture, for a little extra crunch and flavor.
  2. Add finely diced raisins, craisins or dried tart cherries. Add a mixture of all three. The extra sweetness and tartness from these fruits makes the salad even more bright and luxurious.
  3. Diced sundried tomatoes bring a slightly more mature, though more subtle, flavor.


1 Comment

Best Macaroni and Cheese Recipe

A few years ago Good Morning America ran some kind of competition to find the best Macaroni and Cheese recipe. Emeril Lagasse got involved and it was a big production. My mother and I made the winning recipe one night for dinner and I haven’t been able to forget about it since.

This year for our annual Easter brunch Dana and I decided to do a Mac and Cheese side dish, and I knew exactly which recipe I wanted to make. I hopped on the Googles for a quick search through the interwebs, and found the recipe I was looking for. I went to pin it on Pinterest, but realized there were no pictures of the recipe. So, here I am to post a copy of the recipe (with some modifications) and some pictures of the final result.

Emeril’s Best Mac’n’Cheese

  • 1 head of garlic, roasted
  •  1 teaspoon olive oil
  •  1 pound Cavatappi pasta
  •  ½ pound sliced Applewood smoked bacon
  •  1 ½ cups fresh white bread crumbs (5 slices, crusts removed)
  •  ½ cup grated Parmigiano Reggiano cheese
  •  8 tablespoons butter
  •  ¼ cup minced shallots
  •  ½ cup flour
  •  1 quart whole milk
  •  6 ounces Gruyere cheese, grated
  •  8 ounces extra-sharp Cheddar cheese, grated
  •  ½ teaspoon pepper
  •  1 teaspoon salt
  •  ¼ teaspoon freshly grated nutmeg

Preheat the oven to 375, and roast the whole head of garlic with salt, pepper and a drizzle of olive oil in aluminum foil [1]. Squeeze out and mash all the roasted garlic. Cook the bacon. Set aside. Drain all but 1Tbsp of the bacon grease. To make the topping, mix the bread crumps, parmesian cheese, crumbled bacon and 2Tbsp of the butter (melted).

Cook up your pasta [2] and drain according to package directions (maybe cut a minute off, because we have to bake it)

In the grease, and the remaining butter and shallots over low heat. Cook until the shallots are translucent. Add the flour and cook, stirring for 1-2 minutes to form a roux. Bump the stove up to medium, and whisk in the milk and garlic paste. Continue whisking until thickened. Remove from heat and whisk in the remaining salt, pepper, nutmeg and the Cheddar and Gruyere cheeses.

Mix in the pasta. Mix well. Spread into a 9×13 baking pan. Cover with an even coating of the topping.

DSC_3241

Bake, covered, for 15 minutes or until bubbly. Eat way too much. Tell yourself that your diet starts tomorrow. Seriously.

Results

The version I produced suffered from the lack of roasted garlic. However, it was still fantastic and drew several compliments. By the end of the day, the dish was empty. The cheddar and gruyere combination works extremely well, but the cost of the cheese is a little higher than the usual Velveta. The time and effort to prepare this recipe is pretty high compared to others we’ve tried, but the results are definitely better than others too. If you’ve got the time to spare, definitely consider this one for your next event.

Notes

  1. Or you can be like me. We didn’t have any aluminum foil so we used parchment paper instead. The garlic didn’t roast, but instead got burned and crispy. It ended up in the trash and the final product had an emergency dash of garlic powder added instead.
  2. The original recipe called for Cavatappi pasta. We used something else that I don’t remember the name of. So long as you aren’t using a long noodle (linguini or spaghetti, for example), you should be fine. Penne, elbows, farfalle, whatever you want.


Leave a comment

Jam Recipe Ideas

In my last post I talked about what went well in 2012 and what didn’t go so well, and also outlined some of my plans for preserving in 2013. My plan, in a nutshell, is to make more of the things we like and try out some new recipes as well.

All winter I’ve been thinking about novel new jam and jelly combinations. I’ve been inspired, in part, by my new book and things I’ve browsed on Etsy and Pinterest. Also, some ideas came into my head from who-knows-where. Here’s a quick list of 10 recipe ideas that I might like to try this year:

  1. Cherry and Blueberry Jam : I can’t believe I didn’t try this combination last year when we were swimming in both of these delicious fruits. This year, it’s happening for sure, and in future years it’s sure to be a staple (since I now have 2 cherry trees and am planning to buy some blueberries). A little Amaretto, some vanilla and/or some chocolate (if I can get up the nerve to use chocolate in a jam again) would really make this combo pop. Some Pomegranate juice might really push the whole thing over the edge.
  2. Blueberry and Lemon Jelly : I’ve heard of Blueberry-Lemon as a common flavor combination. These two things, in a smooth clear jelly, would be a match made in heaven. There are a few things I could add to this to make it even more complex: Pomegranate, Cherry, Basil, Mint, Lavender or a little bit of my orange extract.
  3. Peach and Cherry Jam : These two great stone fruits definitely belong in the same jam together. I had intended last year to make a white peach and cherry jam, but the white peaches didn’t cooperate and I had to do something else with the cherries before they went bad. A decadent, chunky yellow peach and cherry jam would be awesome with maybe just a touch of amaretto or bourbon.
  4. Peach, Orange and Blueberry Jam : Am I crazy? I think a combination like this, or one with just Peach and Orange, would make a great combination. A little bit of orange juice and zest would help bring the chunks of peach and the whole blueberries together. Consider also with a touch of vanilla or cinnamon. Valencias will be in season at just the right time for this.
  5. Pear and Lemon : This seems like a great combination to me. Sweeten it with a little bit of honey? Add a little cinnamon or vanilla? This one has real potential.
  6. Blueberry and Pear Jam: This might even go well with apples instead of pears. Maybe a little bit of lemon or honey will help it out too. The problem is getting the good blueberries and the ripe pears together in the same place at the same time. Freezerman, to the rescue!
  7. Cranberry Apple Jam: Not a cranberry sauce with apple, but a full-fledged apple mixture with some cranberry added for color and tartness. This would go well with any of the fall seasonings: cinnamon, clove or ginger especially.  With only mild changes this recipe could become Cranberry Apple Butter, instead of a Jam. A splash of orange extract or lemon zest will really brighten this up either way.
  8. Orange, Cranberry and Pomegranate Jelly: I think this recipe has great potential to be similarly festive, but more bright and less homey than the apple variety above. Imagine some of this spread on a fresh-baked gingerbread cookie, or with a little fresh cracked black pepper on a nice, sharp cheese tray. If we boil out the cranberries in a little bit of water or clear apple juice, they’d be a perfect accompaniment to fresh squeezed orange and pomegranate juices, and a little bit of zest.
  9. Mulled Apple Cider Jelly: I did Apple Cider Jelly this year and it was a big hit. Next year I want to try a similar recipe but with mulling spices and maybe a little bit of bourbon (or spiced rum!) thrown in for good measure.
  10. Pina Colada : Pineapple, Coconut and maybe a hint of dark rum. This combination really speaks for itself and would help to bring a little bit of tropical beach to the long winter months. It also gives me an excuse to buy fresh pineapples and fresh coconuts from the store.  Another tropical drink favorite of mine, the Pain Killer, uses  pineapple, coconut, orange and is seasoned with just a little bit of nutmeg. That would be a great alternative recipe to try as well.


Leave a comment

Cranberry Sauce

Some people really love the cranberry sauce that comes out of the can. It’s not bad stuff by any stretch and it does play a vital role for some people in bringing back good memories of Thanksgivings gone by. I never had much of it as a kid so I didn’t have the same emotional attachment that other people do. Instead, I started making my own sauce from fresh berries and really enjoy those results. Here’s my “recipe“.

Cranberry Sauce

  1. Fresh Cranberries
  2. Some liquid
  3. Sugar
  4. Fresh Oranges
  5. Seasonings

Start off with the cranberries. Put them in a colander  give them a good rinse, pick of any stems you find and remove any brown/gooey/mushy/yucky/creepy berries. Dump them all in a big pot. Peel some Oranges. You only want to get the good peel or “zest” from the orange, not the white pith. I like to use a sharp knife or a vegetable peeler to get the peel because I like the look of big chunks in my sauce. You can use a microplane too for good results.

You need some liquid to cook the cranberries in. Most “traditional” recipes I’ve seen in the past call just for water, but I don’t like to use plain water unless I have to. Since I have some oranges laying around without peels, I juice those into the pot as well. This time I added a few cups of leftover limeade we had in the fridge and some extra orange juice. In years past I’ve added apple cider, white wine, or a variety of other flavorful fluids. You want to fill the liquid about 3/4 of the way up the pot to where the tops of the cranberries are. Keep in mind that cranberries float, so if you add too much liquid the level of the cranberries will rise but the relative levels of cranberries to liquid won’t change.  I also like to get some of the orange pulp into the mix too, I scrape some of it out of the juiced oranges with a knife, spoon or even my fingers. It’s just window-dressing at this point, so be creative.

I’ve heard of adding some diced apples to the sauce too. I’ve never tried it but I see no reason why it wouldn’t work.

Next, add some seasonings. I toss in a few cinnamon sticks to start. These look great in the final presentation, even if they aren’t edible. I toss in some cinnamon powder too. I also add, depending on my mood and what I’ve got in my pantry: some clove, nutmeg and maybe even some ginger. Sometimes I add some vanilla extract. Vanilla helps the flavors come together, but you don’t taste much of it in the final product. It gets mostly overwhelmed by the other flavors involved.

I bring the whole pot to a boil, and let it boil for a few minutes until most of the cranberries are popped and the sauce is noticeably thicker.

Now we need to add sugar to make it palatable. Some people like a more tart sauce, some people like it sweeter. Add the sugar in small quantities until you find the amount of sweetness that you prefer. Adding more sugar will help to thicken the sauce up as well.

Preserving

If you want to can it, to have some fresh cranberry sauce at other times in the year, it’s easy to do. If you followed my recipe you may have plenty of acid in the mix already. If you haven’t added all the citrus, or if you want to be belt-and-suspenders sure, add some lemon juice. It never hurts and I usually do. You need to get to a pH of 4.6 or lower.  If you aren’t sure, either add a crapton of lemon juice or go out and invest in a food-grade pH meter. I put the sauce into some sterilized jars and boiled in a water bath for 20 minutes.